Using Mapyx Quo to Create Virtual Field-trips with Google Earth

This post describes an approach I have adopted to create virtual field trips using Mapyx Quo as a starting point to produce interactive annotated virtual field-trips. The initial impetus was to look at the geology around Millers Dale, specifically at the outcrops of the Millers Dale Lava Beds. Details of this trip will follow in the next post.

Quo is reasonably good but the KML exports it produces loose some of the folder-like structure that can be used inside Quo. It alsi has the very annoying feature of inserting timings into all “tracks”, no matter whether theses are logged from a GPS or inserted using a mouse or tablet inside Quo. Tracks are the best way to define areas and linear features for visualisation in Google Earth but timings and associated waypoints just make for clutter. Furthermore, the colours set for tracks and waypoints in Quo is lost on export.

My solution was to write some software (for MS Windows) to:

  1. tidy up the KML export, removing unwanted aspects and putting back some folder structure
  2. generate a javascript configuration file to drive a web page that uses the Google Earth Plugin (API)

The resulting KML may be used with the desktop Google Earth or from a web page (with #2 as the intended case).

The source code is available on GitHub, with an MIT licence. At some point I will produce an installer (sooner if someone asks). The source code should be consulted for specifics that are omitted from this post; there are sufficient comments for non-readers of C#.Net.

There are a number of assumptions about how Quo will be used, and how the software (Quo2GE) will be used, and this post is really an aide memoir for myself.

Organising Waypoints and Tracks in Quo

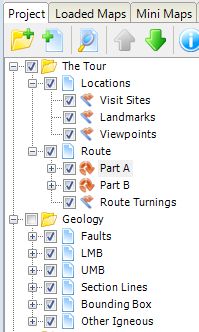
In Quo, create three groups (or two groups and make the first two be layers within the same group), and as content as follows:

  1. A group for points of interest.
    • Within this, create waypoint sets. For each set, specify a different “Point Name Pattern” consisting of a number of alpha-numeric characters followed by “-%N”. The characters comprise a prefix that will be used in Quo2GE to group the waypoints (Quo destroys its own group/layer/waypoint-set structure on export to KML). Note that the “-” sign MUST be present.
    • Any routes will be ignored by Quo2GE.
    • Quo2GE assumes three types of waypoint sets, which can be assigned ad hoc: sites to visit, landmarks, and places that make good viewpoints. These are treated slightly differently by Quo2GE, see below, with implications: for landmarks, add the name of the landmark to the “Note” field for each waypoint; for viewpoints, a place to look at from the viewpoint may be specified by adding to the “Note” field a “@” character followed by the name of any other point of interest, followed by a space character if it is not at the end of the “Note”.
  2. A group containing the walking/driving routes and maybe waypoints at key turns.
    • The waypoints will be ignored by Quo2GE but may be useful if a GPS is used in the field.
    • Several routes may be added, for example to break an over-long route into more walkable units or to separate walking and driving routes. Distinguish the routes by prefix, changing the default “Track 1” etc to something more meaningful. Note: for routes, use a space character (rather than “-” as before) to separate the prefix from the index number. Use different prefixes to allow different groups of 1 or more tracks to be separated in Google Earth. Otherwise use the same prefix.
  3. A group containing geological/geographical features designated using the Quo “track” tool.
    • Use layers to organise the features by type, e.g. a layer for geological faults.
    • Within each layer name the tracks with a prefix followed by a space and then an index number. e.g. “Fault 1”, “Fault 2” etc. The prefix is used by Quo2GE to group the features and to allow different colours to be used for each group.
    • Waypoints will be ignored by Quo2GE.
Example of Quo structure.

Export each of these as a separate KML file (right-click on the group or layer and “Export to…” (file), selecting Google Earth (kml) as the file type).

Quo2GE should work if any of the above groups/layers are omitted.

Using Quo2GE

CaptureQuo2GE

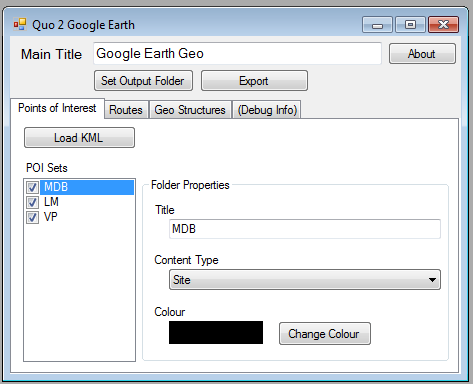
Use “Set Output Folder” to locate the KML files exported from Quo. The same folder will be used for the output of Quo2GE.

Load each of the exported KML files using the appropriate tab. The list on the left (with check-boxes) should enumerate all of the prefixes used for waypoint or track names in Quo. Use the checkboxes to de-select any that you do not wish to see in Google Earth.

For each prefix, the colour to be used in Google Earth may be changed, as may the title (which is initially set to the prefix). The title will be shown in the web page to allow groups of waypoints or tracks to be shown or hidden. They also appear as folder names in Google Earth Desktop.

For points of interest, there are three types that can be assigned to each prefix-set. The points are handled differently in Quo2GE and in the web page:

  1. Points of type “Site” are intended for places a person would visit. In the virtual tour, users can jump to have an aerial view of any of these. The points are shown in Google Earth with the waypoint name, e.g. WPT-002.
  2. Points of type “Landmark” are intended as key landmarks (!). They are shown in Google Earth with the waypoint Note (e.g. “Hammerton Hill”).
  3. Points of type “Viewpoint” are intended as places a person would view their surrounding from (in real life and in the virtual tour). In the virtual tour, users can choose to go to these places; the Google Earth view changes to a near-ground-level view looking north, or towards any point specified in the Quo waypoint Note using “@”.

Set the Main Title and click “Export”.

Using the Output

Several files will be created in the chosen output folder. Those starting “clean” are tidied-up versions of the KML files exported from Quo but without any organisation into folders, application of styles according to Quo2GE. The file allSets.kml has been produced from the cleaned KML and does contain the folders and styling. Use this with  Google Earth desktop.

Use on the web requires use of allSets.kml, gm.html and config.js. hg.html reads config.js to locate the kml file to be used and to set the controls that appear in the web page to allow the view to be manipulated.

Steps:

  • edit config.js so that the kmlHref variable contains the full URL to the ultimate location of the allSets.kml file.NOTE: the kml must be on a web server for the Google Earth plugin to be able to use it, although you can run gm.html from your local machine.
  • add text, change styling etc for gm.html according to your taste.
  • copy all three files to the web space.
  • enter the URL for the gm.html file in your web browser…. it should all appear!

As an alternative, which may be useful if you have several virtual field trips is to place the gm.html file in one folder and to create sub-folders for each trip, which contain the kml and js files. In this case, tell gm.html the name of the sub-folder (e.g. “trip1”) by adding it to the end of the URL, after a “?” (e.g. http://www.test.net/trips/gm.html?trip1).

LED Caving Lamp – Adapting an “Oldham” Caplamp

Some incomplete notes from a recent conversion of 3 old cap lamps to run off white LEDs extracted from a cheap (yet astonishingly bright) headtorch and powered by Lithium-based cells salvaged from an old laptop battery. One of the 3 caplamps was from a 1991 Apex 2 and the others were ex-NCB pit-lamps of unknown age.

Raw Materials

  • some pieces of brass (see below)
  • a 5W, 270 lumen headtorch powered by 3xAAA cells. Cost less than £5 incl postage from Hong Kong via ebay. I bought a few cheap torches looking for suitable de-mountable modules (see the photos below). A simple on-off type was chosen rather than multi-mode (bright, dim, flashing…)
  • A pair of 18650 3.7V Lithium cells with solder tags or salvaged from a laptop battery
  • A cheap “travel charger” for these cells. I bought a pair of cells with a charger for about £5 via ebay and use the cells in a hand-held zoomable torch that serves as a caving backup and dark-corner-probe.
  • A potting box and potting resin (Maplin does suitable)
  • Heat-sink compound (see Maplin’s again)
  • a few solder tags, a couple of M3 machine screws
  • 4x #40-40 stainless steel cap-screws at least 3/4″ long (this is an American standard thread. Try radio control model suppliers)
  • An old caving lamp
  • A through-headset charging part. I had one of these “lying about” but they may be hard to find these days. If so, adapt the design with charging connectors on the battery some-how.

Headset- Components to Make and Fitting

Remove all the components from the headset except the  negative wire (fixed to the body) and the switch moving part and its spring-contact. I actually removed all parts to overhaul everything.

See the dimensioned drawings and photo of the finished result below (both are available in larger size by “clicking” the image). The dimensions on the plate are approximate; be prepared to make some adjustments and in particular note that the photo shows a small cutout to clear the on/off switch. I tapped the holes to secure the LED modules but you could just drill to clear an M3 screw and use a nut on the rear.

Cap Lamp Parts to Make
Cap Lamp Assembled

The smaller part on the drawings is a pillar that will be located at the top of the lamp where the pilot lap is. This needs rounded corners to fit. For the Apex 2 caplamp, this fits neatly without any work on the caplamp body. For my other two, there is a lump to machine away. I used a slot-drill in a pillar-drill but a router-cutter would probably work. Beware that this process exposes some brass. This brass is actually part of the (negative) circuit embedded in the body and it must not be allowed to contact the pillar. The pillar should, however, have a good contact with the body in order to conduct heat away from the LED. I simply milled a recess over it to avoid contact.

Heat-sink compound was applied between the LED module and the plate and both top and bottom of the “pillar”.

The #4-40 screws will have to be made the correct length: 2 at 3/4″ and 2 at slightly less than 5/8″ (both dimensions include the head of the cap-screw – sorry I failed to measure thread-length.) . These screws fasten the brass plate to the cap lamp body. “Clear” in the diagram means that the screw will easily pass through; these are plain drilled holes.

The wiring is mostly obvious from the photograph. The negative wire from the LED is attached to one of the switch contacts using a solder-tag. The other switch contact is not used and was not refitted. Don’t trust the pictures – work it out!

Small padding washers are used for the LED module hold-down. These could be old inner tube, although I used some gasket paper. The idea is just to reduce the risk of damage.

The reflector will need to be sawn off as in the photograph. A Dremel tool (etc) is quite handy for this. Find a way of marking off the cut height or mount the Dremel at a fixed height over a flat surface to get this cut neat, even and to avoid cutting off too much. The LED module I used had quite good combination of central beam and spill-out and the end result with the reflector as shown is quite satisfactory.

Battery Pack

This is just a pair of 18650 cells in parallel cast in potting compound. A piece of rubber was placed beneath the cells to avoid direct contact with the box anywhere. Make sure the hole for the cable is tight otherwise compound will leak out. I would have used a grommit but bought the wrong size. An outer protective layer of inner tube and gaffer tape finishes the job off. This will he helmet mounted and only be used for light caving so is not “bomb proof”; I do not expect to bash my head against many long awkward passages.

Charger

This basically involves mounting the “travel charger” on the side of a box, having soldered mains supply to its circuit board and soldered some take-off wires for the head-set contacts. It is probably best to avoid charging via headset at the same time as separate cells.

Finished Product

NB: the Apex 2 headset was bodged to allow for through-headset charging.


GPS/GPX Waypoints for PDMHS Newsletters 122-133

The download below is a GPX file suitable for GPS and digitak mapping software. The locations are of sites mentioned in the Peak District Mines and Historical Society newsletter editions 122-133. These are not sites I have GPS-located but have been transcribed from grid references in the newsletter. These are sometimes 6 figure OS Grid refs and sometimes 10 figure. They may be wrong! The comments are generally very brief and the intent is that reference is made to the appropriate newsletter, using these “waypoints” as a spatial index. The waypoint names are of the form “PD-N122-03” which means the reference is in Newsletter 122 and is the third one (generally in the “Observations and Discoveries” section).

(At present Newsletters are not on the PDMHS website but many of the old journals are. Join PDMHS!)

GPX download: pdmhs-newsletters-122-133-for-web

Using the British Geological Survey WMS Service with Mapyx Quo

Major kudos to BGS for making their 1:50,000 geological maps available online including via a WMS Service.

I’ve been struggling with scanning BGS maps and importing them into Mapyx Quo for a while. Its an arduous process and the scanned maps contain the roads, placenames etc as well as the OS topographic map I have in Quo so its not as pleasing to use as it could be.

I was thus motivated to write a little Windows .Net programme to access the BGS WMS and automate the import into Quo. The process is not completely automated (partially because Quo uses a non-XML file for storing the user-loaded maps) but is still quite simple.

The programme is not as polished as it could be – its good enough for me – and has only been written with the BGS service in mind (although it could well work with other services).

I am making the Windows installer (I use XP still) available (no warranty blah blah) but please do not distribute it (refer people to this web address instead): download installer (about 350k)

Usage is simple:

  • In Quo set the coordinates to WGS 84 decimal degrees
  • Right-click and copy the location of interest to the clipboard
  • Paste it into WMS2Quo (my programme)
  • Choose which layers you want. e.g Bedrock and Superficial (bedrock is the default)
  • Click “Fetch”. This uses the geonames service to find the name of a nearby location. This will be used in the name of saved files. You can edit/change this in a text-box.
  • (the segment of the geological map should appear)
  • Save the map and a Quo calibration file
  • In Quo “Explorer”, select the “Loaded Maps” tab and use the document-with-green arrow icon to import the map image. This will cause the image AND saved calibration file to be read. I usually now change the transparency to 80%. You should see the geological map in Quo.
  • You can “query” the map one layer at a time to find the kind of rock (etc) at a given point by clicking the mouse on the image. This information is remembered and can be saved out as a GPX file containing “waypoints” for each location. Import this into Quo and set it to show the waypoint “note” and you will get geological labels showing.

There is a “settings” button which can be used to alter the save location, image size etc. Take care and NB that the BGS WMS server will sometimes return a blank image if your image size/map size combination are out of its range. A known bug also means you need to restart the programme if you change the save location. I recommend you change the save location as the first thing you do. Also, watch out for your firewall blocking web access; if you get an error on “Fetch” this is the first place to investigate.

I would like to acknowledge Paul Dixon (paul@elphin.com) as I adapted code of his (GPL Open Source) for the coordinate transformations that are used. This is JavaScript whereas I used C#.Net. I’ve uploaded this for use, adaption or what you will under the same licence: DLL, Source code.

If you would like the C# source code for the “WMS2Quo” app please contact me. Similarly, I’d like to hear of any bugs (you know what I mean by “like”).

GPS Waypoints for Bradwell Area Caves and Mines

The following GPX file uses data from HNH/PeakDistrictCaving, specifically their index to the Bradwell Catchment (PDF).

I created this after a trip around Bradwell Dale, mostly looking at the geology, and compared with a set of GPS waypoints and the tracklog. Based on this, I am sceptical of the accuracy of the Grid Ref for Bradwell Parish Cave. I would place this at SK17255 80605.

Bradwell Catchment GPX file.